Have always wanted a red door. Adds a nice pop of color, and seems to match well to the existing brick and house colors.
Thursday, October 18, 2018
Door needed some paint
After more than three years of having an unfinished door with only primer on it, it was starting to yellow from the weather/sun hitting it. Mum came to visit and I promptly caught a cold. Since we weren’t going anywhere, we started to paint the front door for fun. Here's the full progress of the door's life cycle from when I bought the house, replaced the door, and final paint.
Monday, September 24, 2018
All finalized
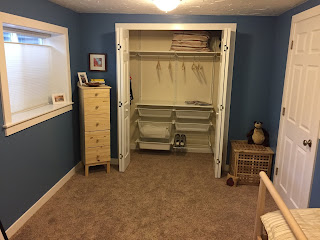
Still had lingering painting to do of doors, even after the bedroom completion, so finally created an assembly-like-line for that and got the remaining done in the weekend. Here's all the pics of the finished product.
 |
| Closet doors finally painted and installed. |
 |
| Ikea closet organizer within. |
 |
| Bed and new side tables just fit into nook. |
 |
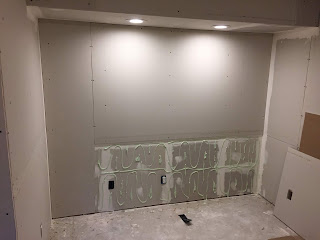
| Still got an empty space to hang a future tv. |
Thursday, September 20, 2018
Carpet is in!
Saturday, September 15, 2018
Pop of new color
Well, I wanted to go bold, but was unsure of my decision. Would it be too dark? Would it be too much blue? I think I made a good decision. It's all done now, and the color really pops - especially against the white trim. Not much more to say, here's all the pictures.
 |
| Cutting in the walls... |
 |
| Can see I already painted the closet a lighter, "cottage white" color. |
 |
| Fully painted with two coats. |
 |
| Can see I'm still painting a load of doors too. |
 |
| With accent wall. Really turned out well. |
Tuesday, September 4, 2018
Finish work begins
Finally pushed through the last of sanding and started with the finish work. First off, I primed the walls and ceiling, and painted the ceiling with flat white paint. Here's a quick look at that.
After that I moved onto the woodworking, which has progressed pretty fast. After doing around the door and the surrounding baseboard shown above, I installed the rest of the baseboard, the closet doors, and the window casing in about a day and half. Here's all that work:
So, next up is painting all the moulding, and then I'll find a paint color for the walls and tackle that.
 |
| Also shows the start of trim-work. |
 |
| Getting the closet doors situated for proper height / fit. |
 |
| Moulding all tacked in. |
 |
| Window, in need of finishing. |
 |
| Wood frame halfway there. |
 |
| All finished up. |
Sunday, August 12, 2018
Self-Induced Attic Diversion
Never mentioned this before, but after I added all the insulation to the attic above the garage, the garage become nice and cool during the start of the summer, but the rest of the house became unbearably hot. It was actually quite impressive how much hotter the house was than the previous year. On one day the air conditioner couldn't get the house lower than 78 degrees, which it never had an issue obtaining before. After some contemplation, I determined that the attic no longer had an adequate source for incoming air. Having plenty of roof vents which the previous owner had added, and a roof fan (obviously a hint there were issues before), there was plenty of places for the air to exit the attic. Problem was, there were never any inputs, apart from the garage. When I finished insulating the garage attic space, I noticed when standing on the ladder into the attic access, with the garage door and window open, the air rushed past me up into the attic. The attic access was the only place for the incoming air to flow into the attic. I'd suspected this was an issue previously, so I then began the task of cutting in soffit vents in the eaves around the entire house. To complement this, I also added plastic rafter vents to ensure the air flowed into the attic unobstructed. No pictures of that, as it was tough enough setting them in place while stapling them to the underside of the roof.
I placed a vent every other rafter which I thought should be plenty. Turned out to work quite well, as there was a noticeable difference after the installation. I increased the roof fan to kick on after it hits 110 degrees in the attic instead of 100, and it only kicks on now during the hottest days (95+ degrees outside).
Long explanation, but here's a look at the work in progress.
 |
| What the eaves looked like before the vents. |
 |
| Cutting into and soffit vents installed. |
Slow Crawl
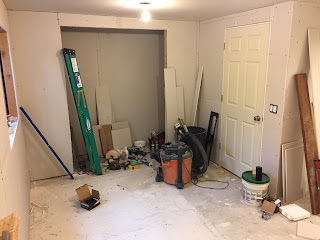
Since I finished the drywall, I moved onto mudding the wall, which is time consuming in itself. As multiple coats are needed to ensure a good concealment of the seams, it isn't quick work. After that, sanding... and that's brutally slow. I've gotten to that point and am not enjoying it (especially the ceiling bits), so the finishing off of the room has been subjected to a slow crawl. Figured I should post some new pics to show I'm actually doing something though. At this point, most of the sanding is done, but I've got to add some additional mud to the corners, then finish it with yet, some more sanding.
So far, the mudding and sanding has taken more work than the theater room did. There are so many more edges and corners, and the closet really adds to the total work. As I mentioned in the last post but never showed any photos, here's a look at applying the green glue for the wall that is next to the bathroom. I wanted to make sure that wall transferred as little sound as possible from the bathroom for obvious reasons...
 |
| Closet corners/edges took at least 3 coats of mudding. |
 |
| A look at the ceiling texture. |
Tuesday, May 29, 2018
Death by drywall
Well I took some time off so I could complete all the drywall. Had time in the afternoon to at least relax, but drywall is so time consuming and exhausting, I feel like it took way more time than it should have. But, it's now all done (mostly). I still have to put up a second layer and some green glue on the adjoining wall to the bathroom.
Also realized the outlet for the mounted tv was going to be too low, and that there wasn't proper framing for mounting a solid tv, so I had the rewire the outlet and also nail in some additional support.
Also realized the outlet for the mounted tv was going to be too low, and that there wasn't proper framing for mounting a solid tv, so I had the rewire the outlet and also nail in some additional support.
 |
| Plenty of support now. |
 |
| A look at the mount mocked up. |
 |
| Finally I can finish drywalling now... |
Monday, May 14, 2018
Journey to drywall
Well, I finally got there. Actually, finally isn't the proper term as I've seemed to complete this room rather quickly. Finished up all the ceiling and wall insulation, along with insulating the ductwork. Also finished up the last of some framing to ensure the drywall had plenty of points to anchor into. It's definitely starting to look like a room now.
 |
| Can still see into the adjoining utility room. |
 |
| Just a little missing. Too many tools in the way. |
 |
| Insulation closes off the room from the utility space. |
 |
| 10 sheets of drywall carried down so far. |
 |
| First sheet up! |
Monday, May 7, 2018
Crazy for insulation
Since I was getting more insulation and all the drywall for the downstairs room delivered, I decided to add on enough R30 insulation to finally insulate the garage attic. I insulated the walls in the garage years ago which helped keep out the cold in the winter, but was always meaning to also insulate the attic as in the summer, the garage will get scorching hot. So... insulation procured...
Woke up early and started one day and only got through one bag. As the access to the attic was too small to fit a full bag through, I had to carry up one batt at a time which was extremely tedious. After the frustration I gave up for the day. Next day I formulated a better plan and made a ramp of spare chipboard to slide the batts into the attic. This allowed me to get more insulation into the attic to work on, so I wasn't constantly going up and down the ladder (or less so).
 |
| 6 bags of R30 24" batted insulation. |
 |
| The chipboard slider. |
 |
| As many batts as possible slid and hucked into the attic. |
 |
| Getting there... |
 |
| A look from the garage access to the attic. |
 |
| All done! 4 bags of shiny white, 2 bags of dirty brown. |
 |
| And butting up to the blown in cellulose over the living space. |
Friday, April 20, 2018
Final framing and electrical
Finished up the major framing and all the electrical work. I added some recessed lights to the framing around the ductwork as it seemed like a nice touch and will add light to the bed or a desk that will be in the space. I also finished the framing for the closet. Took a little bit of time just to figure out the proper rough opening for the closet door sizing that was appropriate. Ended up going with one opening for two 30" wide closet doors.
 |
| Put the lights on a dimmer too, so they aren't too bright. |
 |
| Opening for closet. Looking closely, can see the ceiling is unlevel. |
Sunday, April 8, 2018
New room framing
Got the next exterior wall framed up and added all the insulation to the walls as it was taking up a lot of space in the room. As always, I'm using Roxul R15 insulation in the exterior and Safe n' Sound in the interior walls.
I also finally decided on how I'm going to use the space. I was going to frame in a standard 48 inch opening closet where the walk-in closet used to be, but instead I'm going to move the closet to the right of the door as it makes better sense for the room. So, with the closet moved to the other side of the room, a bed will go where the closet used to. I'm also thinking of making that bed a murphy bed. Figure that will be pretty cool and a good use of space. As I'm typing this though... I don't think I've got enough ceiling height to make that work. Crap...
I thought it would work nicely to add in some recessed lights above the bed space, so wanted to add in a second light switch. Only problem is that I didn't have enough space to add a two-gang box, so I had to extend the wall out. Also, in order to box out the ductwork, instead of boxing around just the duct which I think looks crappy, I extended the framing all the way across the space so it kept the look uniform.
I also finally decided on how I'm going to use the space. I was going to frame in a standard 48 inch opening closet where the walk-in closet used to be, but instead I'm going to move the closet to the right of the door as it makes better sense for the room. So, with the closet moved to the other side of the room, a bed will go where the closet used to. I'm also thinking of making that bed a murphy bed. Figure that will be pretty cool and a good use of space. As I'm typing this though... I don't think I've got enough ceiling height to make that work. Crap...
 |
| Next exterior wall framed in. |
 |
| Had to add in extra framing so wall tied into ceiling. |
 |
| Insulation added. |
 |
| And... I ran out of insulation. |
 |
| Little bit of a before photo. |
 |
| Additional 2x4 wall added to add space for light switches. |
 |
| Making sure everything is level before nailing in. |
 |
| All finished with added blocks so drywall has plenty of anchors. |
Subscribe to:
Comments (Atom)


