Tuesday, September 13, 2022

Fancy up the ceiling

 Initially, the idea was to install pine tongue and grove boards right onto the rafters, but the plastic and insulation pushing down just made it too difficult. Now that a solid OSB base is installed... time to install the pine. I used a chalk line each time before installing the first lines of the boards just to make sure everything was straight.

Toughest part first, cutting around the lights.

Middle section all done.

Side section done.

All done!

Still need to add trim to clean up edges, but a closer look.


Tuesday, September 6, 2022

Ceiling and Walls

 I ordered and had 19 sheets of 1/2" OSB delivered to the house on Thursday for the walls and ceiling. Only after the fact, I discovered I was 2 sheets short and had to have them strategically cut at Home Depot so I could fit them in the car to finish up the walls.

I'm planning on attaching pine tongue and groove boards to the ceiling. I actually started to attach them too, but working on it and trying to measure the spans of wood to attach was just impossible against the plastic and insulation causing the cavities to balloon outwards slightly. So, plan B was to attach osb to the ceiling first so the pine had more of a solid surface to attach to. It should be much easier.

Trusty panel lifter put to work again.

Middle span all done.

Cut around skylights.

Lifting the OSB with the panel lifter was a bit sketchy. Especially on the angled ceiling, I had to disengage the lock on the top of the lifter (which allows the top panel support to swing down to a 30 degree angle for easier panel loading... I'd then push the panel loader into the ceiling, and as it would tilt into becoming flush with the angled ceiling, I would stick 2x4s against the edge at the wall, so the board wouldn't slip and crash down to the floor.

Once again, found an old friend to help lift up the panels.

Back wall all done.

Cut around the windows.

The tougher walls...

Created a cardboard template to cut the tough angles.

Worked great!

I'm still surprised I was able to complete the ceiling and walls in one weekend. It was basically the ceiling in one day and the walls in another day. Little tidbits I used that worked really well - I had so many outlets to cut around, using a level to mark the vertical/horizontal lines where the outlet lay in the adjoining floor and walls worked really well. For instance, I'd mark lines on the floor that corresponded to where the outlet sides were, then put the panel in place, and transfer those lines from the floor to the panel (making sure to keep the level... level. Then I'd cut out the spot for the outlet - It worked great.

Cutting in the paint.

In progress...

All done.


Thursday, September 1, 2022

Door and completed Insulation


Finally got the door installed a month later. Looks really nice now. 
Also completed all the insulation and prep for it. I made sure to use fire-block spray foam around all the outlets so they were properly air-sealed and insulated. As there are so many outlets, I wanted to make sure they didn't leak air into/out of the shed. 
After all the insulation I also wrapped everything in 6 mil vapor barrier, along with taping all the seams and staples which took a fair bit of time. I used some tape from home depot and some tuck tape as well. Technically, you have to use the blue tuck tape for plastic, but the red seemed to work fine (as is super sticky).


Pre-Door

Door!

Spray foam around all the outlets

Taping all the joints

Tape!

More tape!

So much tape!


Wednesday, August 24, 2022

We have lights!

 After much digging, the power has been run to the shed. Single lines (220 power) were run in 1" conduit to the shed for a 40 AMP breaker. A separate grounding rod was pounded into the ground just for the shed, and the sub-panel mounted to the outside with a separate disconnect for the mini-split. Overall, I was really impressed with the work the electrician did.

Good look at the finished trench digging.

Just squeezing by the deck footing.

One more look.

Getting the mini-split mount ready, box installed.

Almost all done.

All done and trench buried over.

Lights!


Monday, August 15, 2022

Time for Power

 Started digging a trench 18" deep for the power conduit to run to the shed. I decided to attempt to do this by hand as I figured it would be really good exercise. Time will tell if this was a horrible idea. It's only 55 feet from the shed to the main breaker panel on the house...

Main power in red marked by bluestakes.

Will be tight digging next to the existing lines.

Start of the tunnel...

Safely dug over top of the the existing power.


Wednesday, August 10, 2022

Shed Insulation

 I'm adding a combo of insulation in the shed. I've got some leftover R-30 fiberglass rolls and then some new R-15 mineral wool for the walls and some of the ceiling. As all the insulation in unfaced and I'd need a vapor barrier over it anyway, I used a 6 mil plastic in place in the ceiling/roof space to hold the insulation up as I went.

Stapling in the plastic around the first rafter space.

A look from the bottom, ready for insulation.

Insulation placed in from above.

Insulation in place.

Another look from above.

Pink stuff all in place.

Adding mineral wool insulation at the side slope.

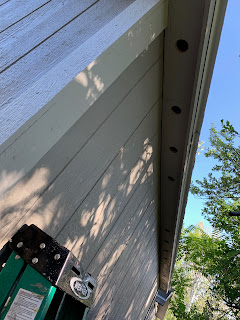
As I was almost finished with the roof insulation, I took care of the other soffit side to ensure all the venting was complete. The before and after is shown below. I spaced the holes every foot in between the support wood.


Saturday, August 6, 2022

Shed Electrical

 Did a mix of soffit vent work and running electrical for the lights and outlets. I wanted to make sure there were plenty of outlets all around, so I may have gone a bit overkill. I discovered I could fit some 4" lights in the soffits for some outdoor entry lights, so I fit those in instead of an exterior wall sconce. I think that'll work out nicely, and there's no worry of the doors hitting them, unlike sconces next to the doors.

Little 2" soffit vents along with recessed 4" lights.